|
Pattern Machine 3D |
|||||
|
|
|
||||
|
|||||
|
Scope of this Tutorial is to show how to create a fully textured bottle Slice Pattern with different vertical cross sections |
|||||
|
Different Vertical Cross Sections Bottle Slice Pattern - Scale 1:1
|
|||||
|
|
|||||
|
First of all we need to Setup a new File. Detail Info |
|||||
|
File Setup Start Pattern Machine 3D Click on New File Use the Jack Daniels Bottle Image Click OK when done
|
|
JackDanielsBottleBackground.jpg
|
|||
|
|
|||||
|
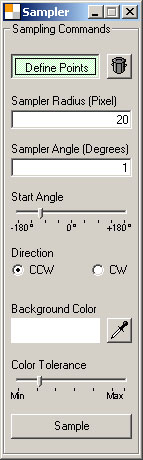
We need to sample our Object outline - We will use the Pattern Sampler for this purpose. Detail Info |
|||||
|
Outline Sampling Display the Pattern Sampler: Configure parameters as shown aside Define start- and endpoint for Sampling. In Pattern Window Click Sample. Adjust Vertices as shown aside
|
Pattern Sampler Beer Bottle: start- and endpoint, Sampled Outline, Adjusted Outline
|
||||
|
|
|||||
|
Once we have the outline of our object, we need to design the cross sections to assign to the outline |
|||||
|
Hide Background Image Menu View > Background Design round cross section
of the bottle neck Design the rectangular cross section of the bottle body. Notes:
|
Segment Setup for Cross Section Design
|
Outline, Bottle Neck and - Body Cross Sections
|
|||
|
|
|||||
|
Once we have our Object Outline and its cross sections we can create the Mesh. Detail Info |
|||||
|
Open
the Mesh Options Window, by clicking Select the Cross Section Tab as shown aside. Assign Bottle Neck Cross Section to Outline
Assign Bottle Body Cross Section to Outline
The final Mesh will result as shown below
|
Mesh Options
|
Assigning the Bottle Neck Cross Section
Assigning the Bottle Body Cross Section
|
|||
|
|
|||||
|
The Mesh defining the geometry of our Object is designed, now we need to define the Material and Texture. Detail Info |
|||||
|
Display Material Editor Click Menu Add Material In the Materials Window Configure the Material Parameters Use the File JackDanielsBottleTexture.jpg
in Notes Obviously you can split You can then assign a Material to each Sub-Object. |
Material Parameters
|
Materials Window
|
|||
|
|
|||||
|
Once we have our Object Mesh and Materials we can proceed to slice the pattern to Elements. Detail Info |
|||||
|
Create Object Preview Select the Object Outline, then in Mesh Options Window, Mesh Section
Select the generated Mesh, then in Mesh Options Window, Elements Section
|
Mesh Options
|
|
|||
|
Elements: 3D Object Preview (front an back) created from Mesh M1
|
|||||
|
|
|||||
|
Once we have our Mesh built from outline and vertical Cross Sections, as well as the Material we can proceed to slice the pattern to Elements. Detail Info |
|||||
|
Create Elements In Mesh Options Window, Cross Section
Create Sewing Allowances (Joints)
|
|
||||
|
Elements: Object Element Pattern with 0,5 cm Joints (seam allowance) created from outline and cross section modeled Mesh
|
|||||
|
|
|
||||
|
The Elements have been created and Materials have been defined. We assign now the Beer Bottle Material to the Beer Bottle Elements. Detail Info |
|||||
|
Assign Material Select the Elements you want to assign the Material to In the Materials Window Select Rendering Element Preview To Render a Viewport Preview |
Materials Window
|
||||
|
Elements: Jack Daniels Bottle Material assigned
|
Elements: Element Rendering Preview
|
||||
|
Elements: Object Slice Pattern
|
|||||
|
Elements: Object Slice Pattern Element Rendering Preview
|
|||||
|
|
|||||
|
We reached the final step of this Tutorial. We have designed our Object,
created and textured Elements. We want now render the Slice Pattern to a large sized, |
|||||
|
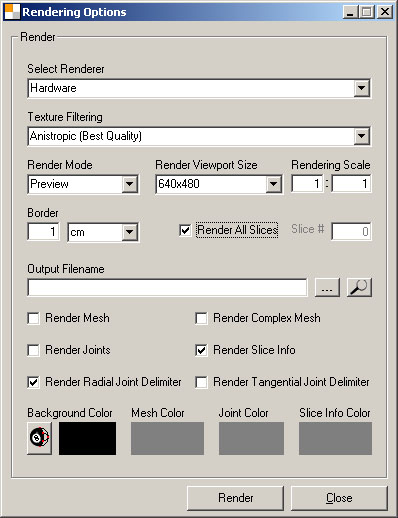
Preview Rendering Options Click Rendering Options Configure Preview Rendering Options as shown aside. Click Render
|
Preview Rendering Options
|
||||
|
Production Rendering Options Configure Production Rendering Options as shown aside. Click Render
The Production Rendering
|
Production Rendering Options
|
||||
|
|
|||||